If you’re developing custom Magento 2 modules, mastering observers is key to extending functionality without touching the core. Observers let you hook into Magento events and run your own code — ideal for customizing checkout, orders, customers, and more.
In this tutorial, we’ll show you how to create a Magento 2 observer using the example module Magencode_MyModule. You’ll learn what each essential file does and get ready-to-use code snippets.
What Is an Observer in Magento 2 and Why Use It?
An Observer in Magento 2 is a class that listens for specific system events. When an event occurs — like an order submission or customer login — Magento runs any attached observer classes.
This is the recommended way to add custom functionality without rewriting Magento’s core code, making your modules future-proof and upgrade-safe.
Module File Structure
Below is the directory structure of the Magencode_MyModule used to implement the Magento 2 observer. This shows where each configuration and class file is placed.
├── etc
│   ├── events.xml
│   └── module.xml
├── Observer
│   └── Checkout
│       └── SubmitAllAfter.php
└── registration.php
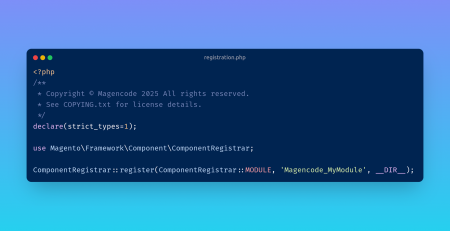
Registering the Magento 2 Module
Every module starts with a registration.php file that tells Magento it exists.
<?php
/**
 * Copyright © Magencode 2025 All rights reserved.
 * See COPYING.txt for license details.
 */
declare(strict_types=1);

use Magento\Framework\Component\ComponentRegistrar;

ComponentRegistrar::register(ComponentRegistrar::MODULE, 'Magencode_MyModule', __DIR__);
This registers the module under the name Magencode_MyModule so Magento can detect it during setup and execution.
Declaring the Module
Next, we declare the module configuration to Magento.
<?xml version="1.0" ?>
<config xmlns:xsi="http://www.w3.org/2001/XMLSchema-instance" xsi:noNamespaceSchemaLocation="urn:magento:framework:Module/etc/module.xsd">
	<module name="Magencode_MyModule"/>
</config>
Configuring the Magento 2 Observer Event
We tell Magento which event our observer listens to using the events.xml configuration file.
<?xml version="1.0" ?>
<config xmlns:xsi="http://www.w3.org/2001/XMLSchema-instance" xsi:noNamespaceSchemaLocation="urn:magento:framework:Event/etc/events.xsd">
	<event name="checkout_submit_all_after">
		<observer name="magencode_mymodule_observer_checkout_submitallafter_checkout_submit_all_after" instance="Magencode\MyModule\Observer\Checkout\SubmitAllAfter"/>
	</event>
</config>
Explanation:
- Event name:
checkout_submit_all_after(runs after checkout is completed). - Observer name: Internal identifier.
- Instance: Full class name of the observer.
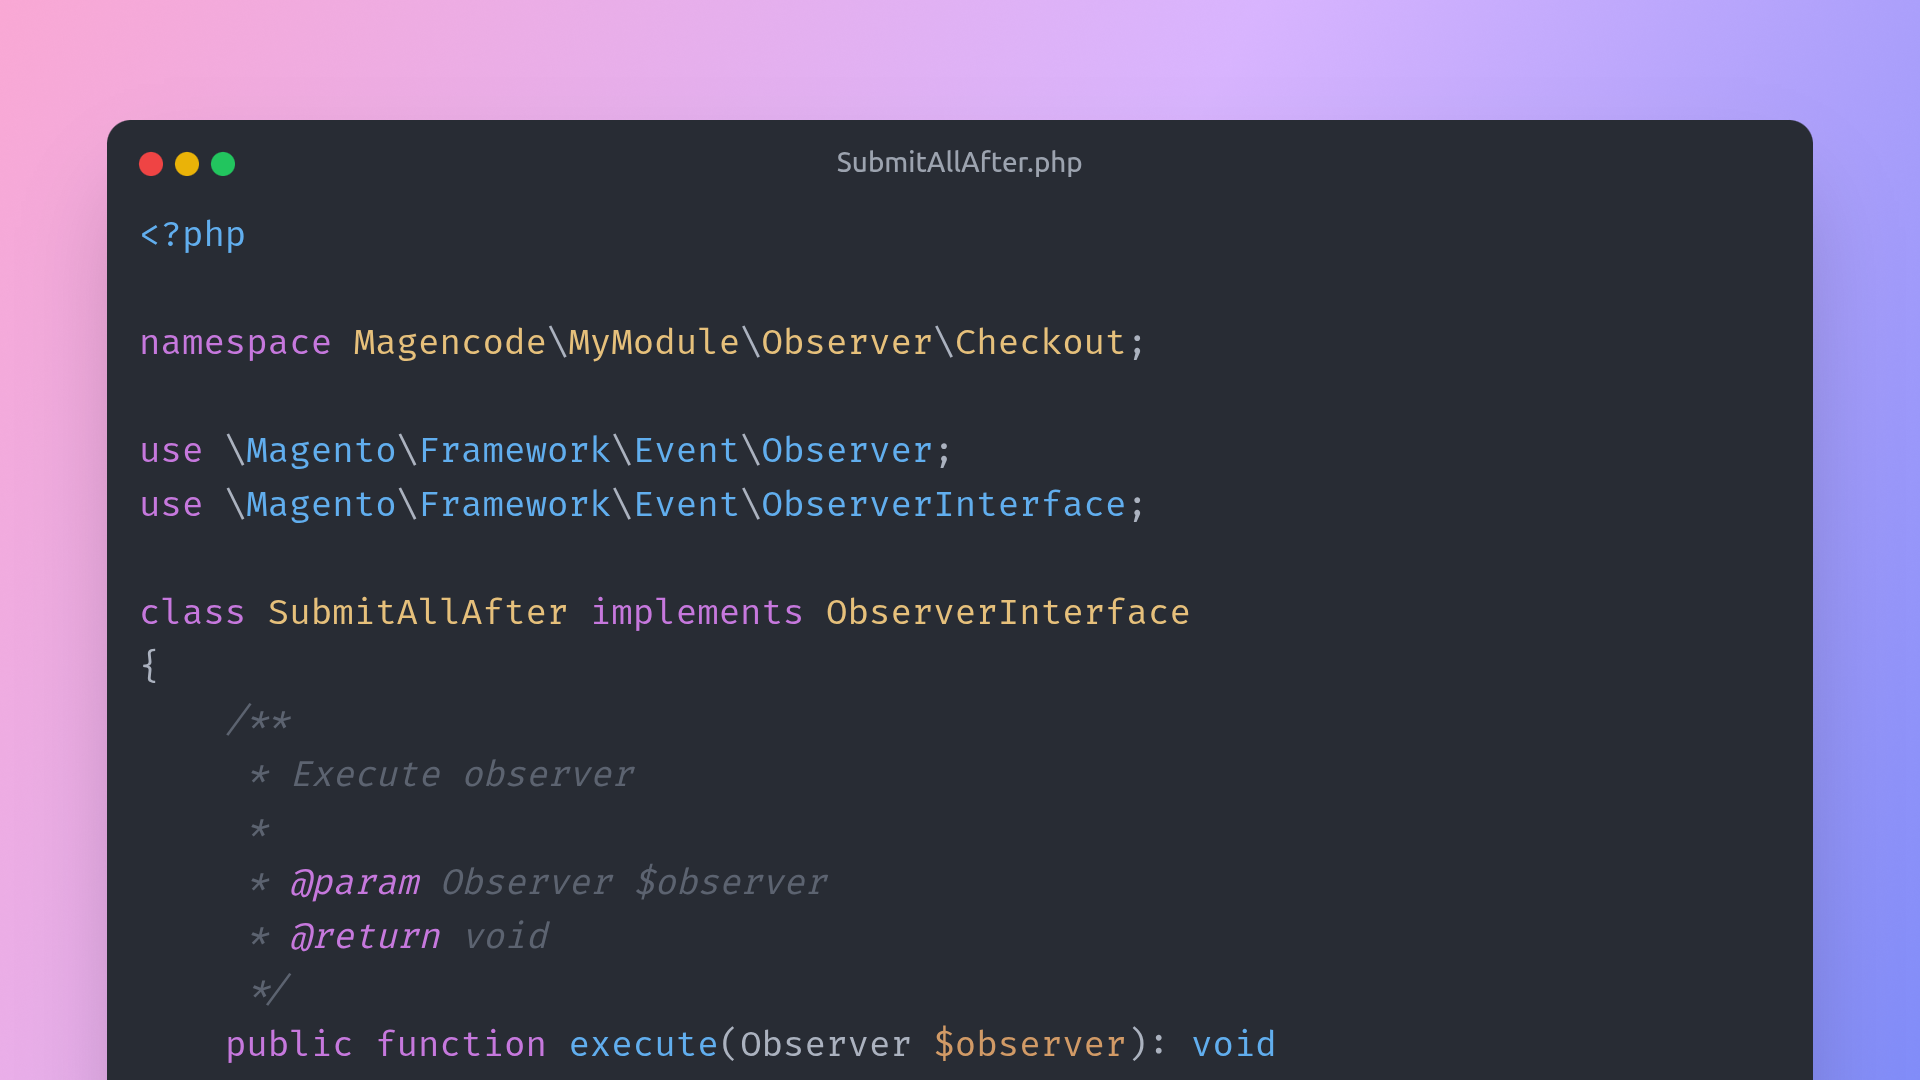
Writing the Magento 2 Observer Class
Now we define the class that will run when the event is triggered.
<?php
/**
 * Copyright © Magencode 2025 All rights reserved.
 * See COPYING.txt for license details.
 */
declare(strict_types=1);

namespace Magencode\MyModule\Observer\Checkout;

use \Magento\Framework\Event\Observer;
use \Magento\Framework\Event\ObserverInterface;
use Psr\Log\LoggerInterface;

class SubmitAllAfter implements ObserverInterface
{
    protected $logger;

    public function __construct(LoggerInterface $logger)
    {
        $this->logger = $logger;
    }

    /**
     * Execute observer
     *
     * @param Observer $observer
     * @return void
     */
    public function execute(Observer $observer): void
    {
        $order = $observer->getEvent()->getOrder();
        $this->logger->info('Order submitted: ' . $order->getIncrementId());
    }
}
Explanation:
- Implements
ObserverInterface: Makes it a valid observer. - Dependency injection: Uses
LoggerInterfaceto log order details. execute()method: Magento calls this automatically when the event fires.
Running Magento 2 Setup and Cache Commands
Once you’ve created or modified your Magento 2 module, you must tell Magento to recognize it by running setup and cache commands.
These commands ensure Magento updates its internal records and clears outdated cached data.
php bin/magento setup:upgrade
php bin/magento cache:clean
Explanation:
setup:upgrade: Registers new modules, applies database schema changes, and runs data patches.cache:clean: Clears Magento’s cache so new configurations and changes are applied.
You should run these commands every time you install, upgrade, or modify a module to avoid errors and ensure smooth operation.
Benefits of Using Observers in Magento 2
Magento 2 observers are perfect for:
- Sending order or customer data to external systems.
- Triggering custom actions after checkout or shipment.
- Logging events or debugging.
- Updating third-party services without touching Magento’s core.
Using observers ensures your module is modular, maintainable, and upgrade-safe — all best practices for modern Magento development.
Final Thoughts on Magento 2 Observer Development
By following this guide, you now know how to:
Register a Magento 2 module
Declare the module’s version
Configure an observer event
Write the observer class to execute custom logic
The Magencode_MyModule example is a great starting point for more advanced integrations like CRM sync, ERP updates, or notification systems.

Leave a Reply