Magento 2 provides a robust Web API framework that allows developers to expose custom functionality as REST or SOAP endpoints. This is incredibly valuable for connecting your store to third-party platforms like ERPs, CRMs, or mobile apps. In this guide, we will create a Magento 2 API in a custom module called Magencode_MyModule. By following Magento’s service contract pattern, we ensure the API is clean, upgrade-safe, and easy to maintain.
Why a Magento 2 API
A Magento 2 API enables secure and structured communication between your store and external applications. Instead of exposing raw database queries or hardcoded scripts, Magento’s Web API system allows you to define contracts that clearly describe available methods, expected inputs, and return formats. This approach improves code stability, makes it easier to document, and ensures future Magento updates won’t break your integration.
File Structure for the Magento 2 API
Your module will follow this structure:
Magencode/MyModule/
├── Api
│   └── MessageManagementInterface.php
├── etc
│   ├── di.xml
│   ├── module.xml
│   └── webapi.xml
├── Model
│   └── MessageManagement.php
└── registration.php
Each file plays a specific role, and understanding them individually is key to building a reliable API.
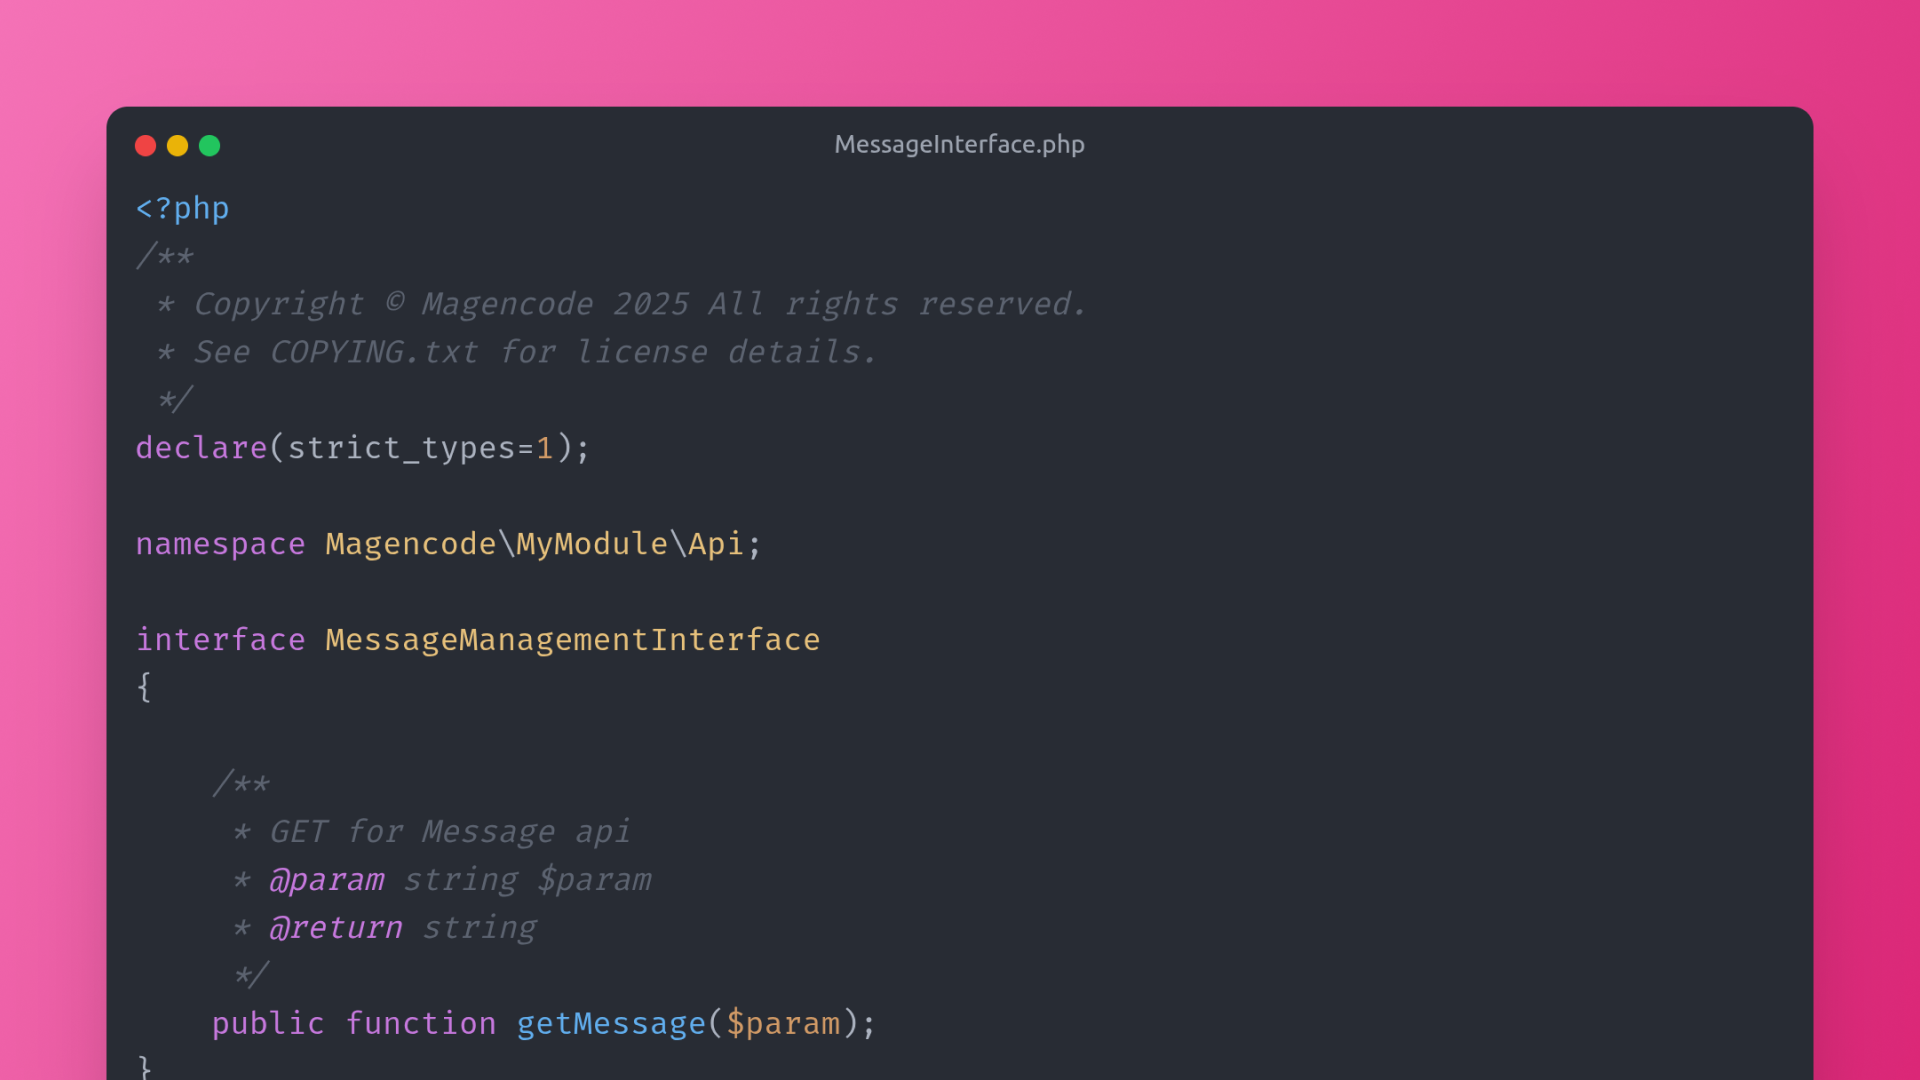
Defining the API Contract in MessageManagementInterface.php
The Api/MessageManagementInterface.php file is where we define the public-facing API contract. This contract lists the methods available for external calls, along with their expected return types.
<?php
/**
 * Copyright © Magencode 2025 All rights reserved.
 * See COPYING.txt for license details.
 */
declare(strict_types=1);

namespace Magencode\MyModule\Api;

interface MessageManagementInterface
{

    /**
     * GET for Message api
     * @param string $param
     * @return string
     */
    public function getMessage($param);
}
The @api annotation signals Magento that this interface is part of the public API. This ensures the method will be available for REST or SOAP calls.
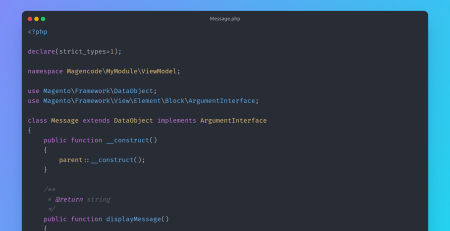
Implementing the API Logic in MessageManagement.php
The actual business logic lives inside Model/MessageManagement.php. This is where you fulfill the contract defined in the interface.
<?php
/**
 * Copyright © Magencode 2025 All rights reserved.
 * See COPYING.txt for license details.
 */
declare(strict_types=1);

namespace Magencode\MyModule\Model;

class MessageManagement implements \Magencode\MyModule\Api\MessageManagementInterface
{

    /**
     * {@inheritdoc}
     */
    public function getMessage($param)
    {
        return 'hello api GET return the $param ' . $param;
    }
}
This example simply returns a string, but in a real-world use case, you could retrieve customer data, process orders, or interact with external APIs.
Configuring Dependency Injection in di.xml
The etc/di.xml file tells Magento which class implements the interface. This is essential because Magento resolves dependencies through its Dependency Injection container.
<?xml version="1.0" ?>
<config xmlns:xsi="http://www.w3.org/2001/XMLSchema-instance" xsi:noNamespaceSchemaLocation="urn:magento:framework:ObjectManager/etc/config.xsd">
	<preference for="Magencode\MyModule\Api\MessageManagementInterface" type="Magencode\MyModule\Model\MessageManagement"/>
</config>
Without this mapping, Magento wouldn’t know how to handle calls to the interface.
Exposing the API Endpoint in webapi.xml
The etc/webapi.xml file is where we declare the endpoint URL and configure its accessibility.
<?xml version="1.0" ?>
<routes xmlns:xsi="http://www.w3.org/2001/XMLSchema-instance" xsi:noNamespaceSchemaLocation="urn:magento:module:Magento_Webapi:etc/webapi.xsd">
	<route url="/V1/magencode-mymodule/message" method="GET">
		<service class="Magencode\MyModule\Api\MessageManagementInterface" method="getMessage"/>
		<resources>
			<resource ref="anonymous"/>
		</resources>
	</route>
</routes>
Here, the route /V1/magencode/message is exposed via the GET method, available to all (anonymous) users. You can restrict this to logged-in users by changing the <resource> tag.
Declaring the Module in module.xml
The etc/module.xml file declares the module to Magento. This includes the module name and version.
<?xml version="1.0" ?>
<config xmlns:xsi="http://www.w3.org/2001/XMLSchema-instance" xsi:noNamespaceSchemaLocation="urn:magento:framework:Module/etc/module.xsd">
	<module name="Magencode_MyModule"/>
</config>
This is critical for Magento to recognize and load your module.
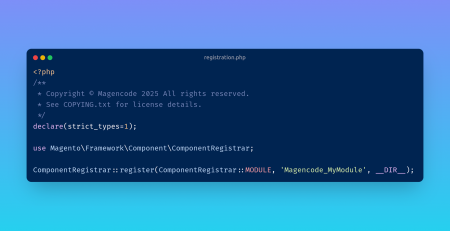
Registering the Module in registration.php
The registration.php file registers your module within Magento’s component registrar system.
<?php
/**
 * Copyright © Magencode 2025 All rights reserved.
 * See COPYING.txt for license details.
 */
declare(strict_types=1);

use Magento\Framework\Component\ComponentRegistrar;

ComponentRegistrar::register(ComponentRegistrar::MODULE, 'Magencode_MyModule', __DIR__);
Without this file, Magento would not include your module during initialization.
Enabling and Testing the Magento 2 API
Once all files are in place, activate the module:
php bin/magento setup:upgrade
php bin/magento cache:flush
You can test your API endpoint by visiting:
GET http://yourdomain.com/rest/V1/magencode/message
The expected response is:
"hello api GET return the $param "
Conclusion: Build a Magento 2 API the Right Way
By clearly defining a service contract, implementing the logic in a model, configuring dependency injection, and exposing it via webapi.xml, you can create a Magento 2 API that is secure, maintainable, and integration-ready. This structure not only follows Magento best practices but also ensures your code remains upgrade-safe for years to come.


Leave a Reply